 DIRTY
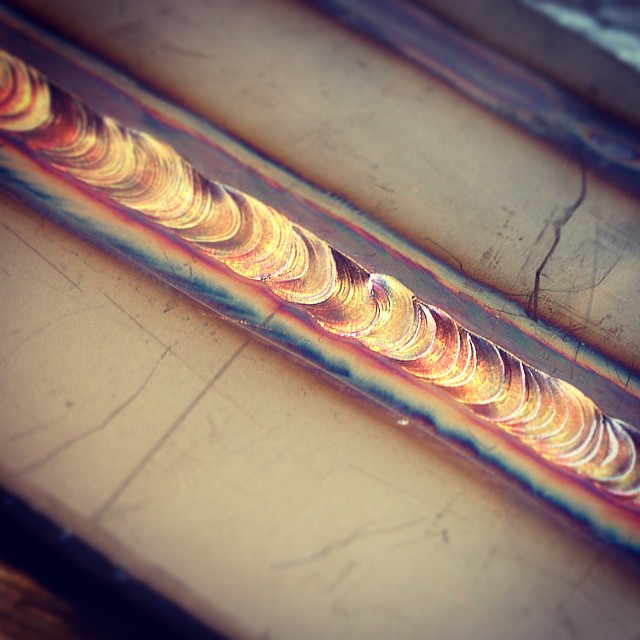
Thin stainless steel usually goes wrong before the weld goes wrong. The grade is guessed, the joint is left with a gap, a flap disc that was used on mild steel touches the surface, or the gas is turned up to hide a leak. Then the part moves, the root turns grey and the finished weld is polished until nobody can see what happened.
A better result starts with a controlled bench, not a clever torch movement.
This guide is aimed at common austenitic stainless steels such as 304/304L and 316/316L in light sheet and tube work. Duplex, high-alloy, pressure, structural, pharmaceutical and sanitary jobs need the correct qualified welding procedure and acceptance criteria. Use the method below as a workshop checklist, not as a substitute for the drawing, the welding procedure specification (WPS) or the material supplier's instructions.
1. Confirm what is on the bench
Do not choose filler by appearance. A clean piece of 304 and a clean piece of 316 can look identical. Check the material certificate, stock marking or job documentation. If the grade is unknown and corrosion performance matters, identify it before welding.
The common filler choices are useful to remember, but they are not universal approvals:
- 304 and 304L are commonly welded with ER308L filler;
- 316 and 316L are commonly welded with ER316L filler;
- stainless-to-carbon-steel joints commonly use an over-alloyed filler such as ER309L.
Service temperature, corrosion exposure, dilution, strength and the governing code can change that choice. For a critical job, use the specified consumable rather than a workshop rule of thumb.
TWI also notes that there is no type 304 filler metal in normal use; type 304 is generally welded with type 308 filler. TWI: welding austenitic stainless steel
2. Keep carbon steel out of the preparation
A stainless job needs its own clean tools. That means dedicated stainless-steel wire brushes, abrasives, files and ideally a separate preparation area. A grinder that has just worked on mild steel can embed iron in the stainless surface. Those particles can rust later even when the weld itself is sound.
Remove oil, marker residue, adhesive and moisture from both sides of the joint and from the filler rod. Use an approved non-chlorinated cleaner and allow it to dry completely. Do not use chlorinated brake cleaner or allow chlorinated-solvent vapour near an arc. Ultraviolet radiation and heat can decompose chlorinated compounds into highly toxic gases, including phosgene. OSHA: welding and chemical hazards
Fit-up comes next. Thin stainless punishes gaps because the welder must spend more time and add more filler to bridge them. That adds heat exactly where the part is already weak. Cut the edges accurately, remove burrs and clamp the joint so it cannot open as the first tacks shrink.
3. Set the bench before setting the amperage
For conventional DC TIG on these austenitic grades, the basic setup is straightforward:
- DC electrode negative (DCEN);
- clean 100% argon for the torch;
- a sharp ceriated or lanthanated tungsten, prepared on a clean dedicated wheel;
- a cup and gas lens suited to the joint and access;
- clean, dry hoses and leak-free fittings;
- the correct filler, if the joint requires it;
- local exhaust ventilation positioned to capture fumes without pulling away the shielding gas.
Miller's general TIG troubleshooting guidance uses 15–20 cubic feet per hour, roughly 7–9.5 litres per minute, as a common shielding-gas range. Treat that as a starting range for a conventional setup, not a number to copy blindly. Cup size, gas lens, electrode stick-out, joint shape and drafts all change the requirement. More flow is not automatically more protection: a poor seal, a cross-draft or turbulent flow can still pull air into the shield.
Keep the arc short. A long arc spreads the heat, makes the pool less stable and gives the atmosphere more opportunity to reach the hot metal. If the tungsten touches the pool or filler, stop and regrind it. Continuing with a contaminated electrode is rarely quicker than correcting it immediately.
4. Decide whether the root needs a purge
A torch only shields the side it can reach. On a full-penetration butt joint or an open-root tube weld, the back of the joint also becomes hot enough to oxidise. Without protection, the root can develop heavy granular oxidation often called sugaring. It is not merely ugly: oxidation and chromium depletion can reduce corrosion resistance.
For TIG root passes in austenitic stainless steel, TWI recommends an inert back purge, with argon normally used. Miller likewise recommends 100% argon for TIG shielding and purging on stainless tube and pipe.
A practical purge setup needs:
- dams or tape that limit the volume being filled;
- an argon inlet at the low point and a vent at the high point, where the shape of the part allows it;
- enough time for the air to be displaced before striking the arc;
- a low, controlled flow that does not pressurise the joint or push the root bead out;
- an oxygen meter when the job has a defined oxygen limit or high-purity requirement.
Do not seal the cavity without an outlet. Do not assume that a hissing hose means the oxygen level is acceptable. Many specifications maintain the purge through the root and hot pass, or until the root region has cooled below about 250°C; the actual WPS or customer requirement takes priority. TWI: avoiding heat tint
A lap joint that does not expose a molten root may not need the same purge arrangement. The decision comes from the joint design, penetration and service requirement—not from the word “stainless” alone.
5. Control heat with preparation and sequence
Austenitic stainless steel conducts heat much less effectively than ferritic steel and expands more as it heats. TWI gives useful scale to the difference: at room temperature its thermal conductivity is about one-third that of ferritic steel, while its thermal expansion is about 30% higher. That combination is why a thin stainless panel can pull out of shape so quickly.
The useful response is not simply “turn the amps down.” Too little current can leave the torch sitting over the joint while heat spreads into the sheet. The aim is to establish a small controlled pool promptly, achieve fusion and move.
On the bench:
- make the fit-up as tight and even as the joint requires;
- place small, sound tacks often enough to hold alignment;
- use clamps and, where suitable, a clean copper chill or backing bar;
- weld short balanced sections rather than running one long seam in a single direction;
- alternate positions so shrinkage is not concentrated on one side;
- allow the part to cool between sections when the procedure permits;
- use the smallest practical pool and filler size for the joint;
- avoid unnecessary weaving on thin sheet.
Pulse can make the rhythm easier and reduce average heat input when it is set correctly. It is not an automatic cure. A poor peak current, background current or travel speed can still produce lack of fusion or too much heat. Make a coupon from the same grade and thickness, with the same joint and backing, before touching the finished part.
6. What to do while the arc is on
Hold only enough torch angle to see and travel. Excessive angle lengthens the gas path and can draw air into the weld. Keep the tungsten close without touching. Feed filler into the leading edge of the pool while keeping the hot end of the rod inside the gas envelope; repeatedly pulling it into room air can oxidise the tip and carry contamination back to the pool.
Watch the edges of the pool, not the bright centre of the arc. Both edges must fuse. If one side is not wetting, correct the torch position, fit-up or current rather than covering the problem with filler.
At the end, fill the crater and use downslope if the machine provides it. Hold the torch over the hot weld until post-flow finishes. Snatching the torch away can leave the crater and tungsten exposed while they are still hot enough to oxidise.
7. Read the colour, but do not grade the weld by colour alone
Heat tint is an oxide formed while the stainless surface is hot. TWI explains that the scale itself is not very protective and that the surface below can become depleted in chromium. Purple and blue oxides generally indicate greater susceptibility to corrosion than lighter tint.
Colour is useful evidence, but it is not a universal acceptance chart. The allowable tint depends on the alloy, the service environment and the applicable specification. A decorative handrail, a food pipe and a chloride-service process line do not share the same acceptance rules.
If the coloured band keeps widening, check the causes in this order:
- gas leak, empty cylinder or contaminated gas line;
- cross-draft or extraction hood pulling the shield away;
- cup too small, poor gas-lens setup or excessive stick-out;
- long arc or excessive torch angle;
- travel too slow, repeated remelting or too much filler;
- inadequate purge on the root side.
A grey, crusted or sugared root is a failed shielding condition, not a surface colour to polish casually. Stop and correct the purge before making more weld.
8. Cleaning is part of the weld
A shiny brushed surface is not proof that corrosion resistance has been restored. TWI notes that the oxide scale and the chromium-depleted layer below it must be removed. Hand brushing can remove loose colour but may not remove the depleted layer.
Mechanical finishing, pickling and passivation have different jobs. Grinding can remove oxide and damaged surface material. Pickling removes scale and the depleted layer. Passivation removes light iron contamination and supports the formation of the passive film, but it does not remove heavy weld oxide or the chromium-depleted layer.
TWI reports that grinding followed by acid pickling gives the best recovery in the conditions it discusses and recommends 360 grit or finer for grinding before pickling. Pickling products can contain nitric and hydrofluoric acids. These are not ordinary workshop cleaners: they can cause severe injury and require trained handling, specified PPE, ventilation, spill control and proper waste treatment. Never mix a homemade acid treatment. Use the approved site procedure and product instructions, or send the part to a specialist. TWI: removing heat tint
A quick fault table for the bench
| What you see | Likely causes | Check first |
|---|---|---|
| Wide blue or purple band | Too much heat or poor shielding | Arc length, travel speed, leaks, cup and drafts |
| Grey granular root | Air reached the hot root | Purge seal, outlet, pre-purge time and oxygen level |
| Blackened tungsten | Lost shielding or insufficient post-flow | Cylinder, hoses, torch seals and post-flow |
| Pinholes or dirty pool | Oil, moisture, oxide or a gas leak | Clean both faces and filler; leak-test the system |
| Panel pulls out of shape | Weak tacking, poor sequence or excessive heat | Fit-up, clamps, tack spacing and weld order |
| Rust spots after fabrication | Embedded carbon-steel contamination | Dedicated brushes, abrasives, table and storage |
| Crater crack at the stop | Abrupt current stop or unfilled crater | Downslope, filler timing and end technique |
Before the part leaves the bench
- Confirm the joint is fused along both edges and has no visible cracks, unacceptable undercut or missed sections.
- Inspect the root when it is accessible; a clean cap cannot hide an oxidised root.
- Check dimensions after the part has cooled and the clamps are released.
- Remove heat tint to the level required by the service and specification.
- Use penetrant testing or other inspection when the drawing, code or risk requires it.
- Record the grade, filler, gas and procedure on traceable work.
Do not trade weld quality for clean-looking air
TIG may produce less visible fume than some other arc processes, but invisible does not mean harmless. Stainless-steel welding fume can contain chromium and nickel. HSE recommends local exhaust ventilation at the source and suitable respiratory protection when extraction alone does not adequately control exposure. Position extraction close enough to capture the plume without stripping away the shielding gas. HSE: controlling welding fume
The practical rule is simple: clean material, tight fit-up, stable shielding, a protected root and a deliberate weld sequence. Get those five things right and the torch work becomes easier. Ignore them and no pulse programme, polished cap or expensive machine will give the stainless steel back what the process has taken away.
References and original documents
This is an independent explanation, not a hands-on test or endorsement.
- TWI — Welding of Austenitic Stainless Steel, Part 2 — Filler selection, back purging, thermal conductivity, expansion, distortion and corrosion considerations.
- TWI — Avoiding Heat Tint During Welding of Stainless Steels — Heat-tint formation, corrosion implications and practical back-purge guidance.
- TWI — Removing Heat Tint from Stainless Steels — Post-weld cleaning, grinding, pickling and limits of wire brushing.
- Nickel Institute — Welding of Stainless Steels and Other Joining Methods — Technical guide to stainless-steel weldability, joint preparation and welding practice.
- Miller Electric — Guide to TIG Welding Basics — TIG setup, DCEN, tungsten preparation, shielding-gas troubleshooting and post-flow.
- Miller Electric — Stainless Steel Tube and Pipe Welding — Argon shielding and purging, dedicated preparation tools, fit-up and heat-input control.
- ESAB — Best Practices for Welding Thin Materials — Typical filler-metal matching for 304, 316 and stainless-to-carbon-steel joints.
- HSE — Welding Fume: Protect Your Workers — Hierarchy of controls, local exhaust ventilation and respiratory protection.
- OSHA — Welding, Cutting and Brazing: Chemicals — Chemical hazards including the decomposition of chlorinated cleaning residues.
- Wikimedia Commons — Stainless Lap Joint — Cover photograph by Joel Washing, licensed CC BY 2.0.
This article is general workshop guidance, not a qualified welding procedure. Pressure, structural, sanitary, high-purity and safety-critical work must follow the applicable WPS, code, material requirements and inspection plan. Welding, grinding and chemical post-weld cleaning require competent risk assessment, extraction and appropriate PPE.
Comments
Real experience is welcome here. Disagree with the article, the sources or another comment — keep it useful and respectful.
No comments yet. Start the discussion.